| CHAPTER | 8 |
| Payroll | |

|
|
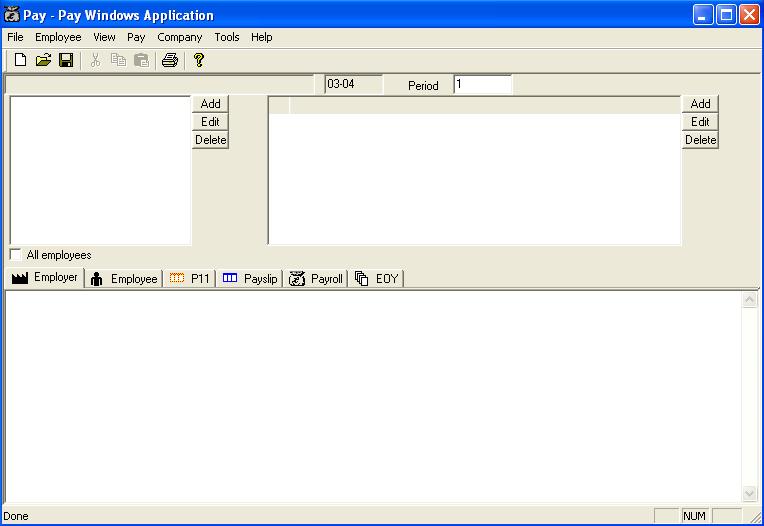
Forbes Payroll is a payroll package designed to be very easy to use. It is intended for use by accountants doing a number of small payrolls.
8.1.1 Features of the package
|
8.2.1 Starting the payroll program
Alternatively select the employer in the client database and choose Payroll from the Tools menu.
8.2.2 Company Details
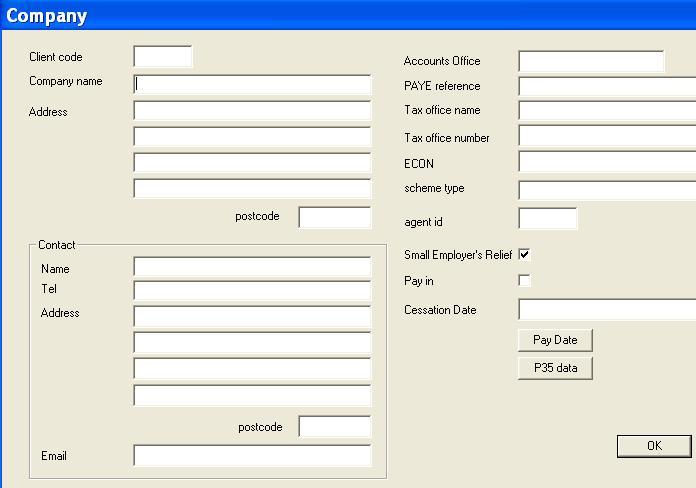
Select Details from the Company menu to set up the company details.
|
8.2.3 Adding employees.
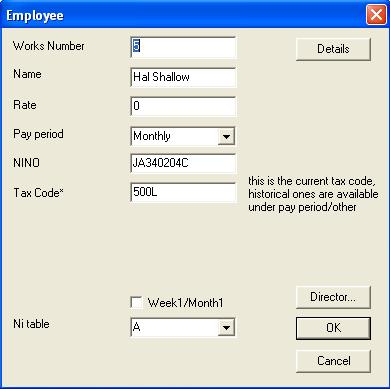
Click on the Add button in the Employee group. Fill in the employee's details.
The rate field is for the default monthly or weekly gross pay. This can easily be overridden later. It is important to fill in the taxcode box.
8.2.4 Employee details.
Click on the Add button in the Employee group. Fill in the employee's details.
The rate field is for the default monthly or weekly gross pay. This can easily be overridden later. It is important to fill in the taxcode box.
|
further details can be completed by pressing the details button
|
8.2.5 Changing year.
Go to Tools then User Setup.
8.2.6 Saving the payroll.
Choose Save from the File menu. Forbes PAYE suggests a filename. You should override this if it is different from you client code.
8.2.7 Opening an existing payroll.
Choose Open from the File menu. Select the payroll you have previously saved.
8.3.1 Entering pay for a period
To enter pay for a period, first select an employee (single click), then press the Add button.
Enter the period number, e.g. 2 for month 2 (May) or Week 2 if weekly paid employee and the gross pay. The tax code for the period will be picked up from under employee details. To go back and change pay for a period, select the period and press the Edit button.
8.3.2 Entering pay and tax from a previous employment.
Select the employee. Select the pay period when the information becomes available. Press the Edit button to bring up the details of that particular pay period. Press the Prev Emp tab. Fill in the details of gross pay and tax from the previous employment.
8.3.3 Detailed breakdown of pay
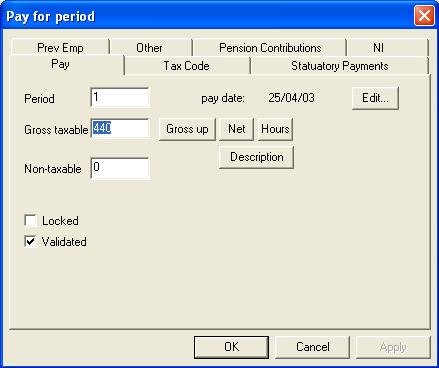
Select the employee and the period. When the Pay dialog appears as below, click on the description button.
|
Enter the descriptions and amounts. You can also enter an optional code starting with a # sign. When you press OK, the totalled income will go into the gross box.
8.3.4 Detailed breakdown of deductions
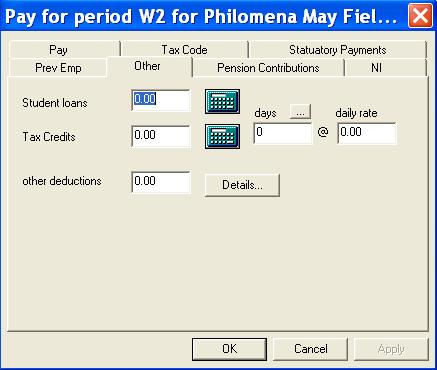
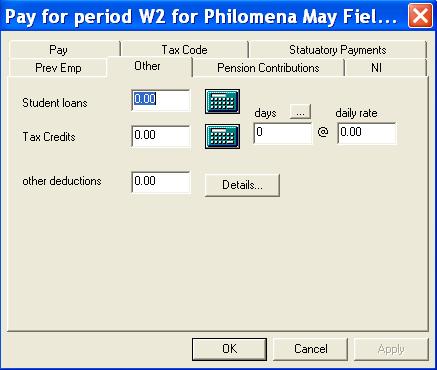
When the pay dialog is displayed, press the "Other" button. This will bring up the other pay details dialog shown below.
|
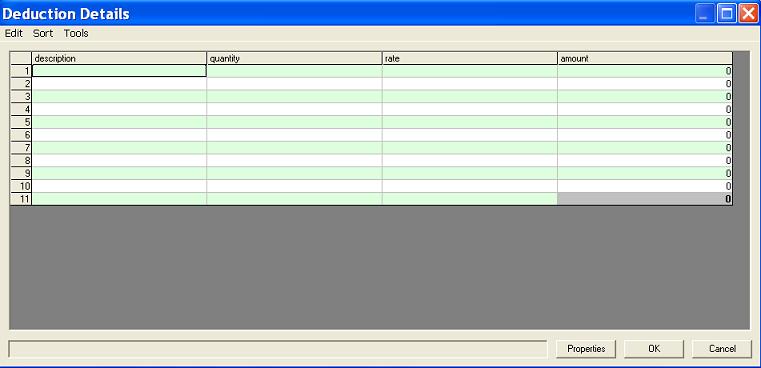
Press the "Details" button, to bring up the pay details dialog shown below
|
Enter the descriptions and amounts. You can also enter an optional code starting with a # sign.
8.4.1 P11 Calculations
Click on the P11 tab to the bottom of the payroll screen. You get the choice of Tax and NIC, Tax only or NIC only
This will complete a P11 calculation sheet for the currently selected employee. (Below is an example of choosing Tax only).

|
8.4.2 NI tables
If you need to use a NI table other than table 'A' for an employee, change the table by selecting the employee and pressing the Edit button to bring up their details. Modify the NI table.
To retrospectively change the NI table selection for a previous pay period, select the period and use the Edit button.
8.4.3 Directors NI
For calculating directors NI press the director button under employee details.
8.4.4 Monthly payroll
Click the Payroll tax and then the Monthly or Weekly to produce a total of all employee pay.
8.5.1 Printing Payslips
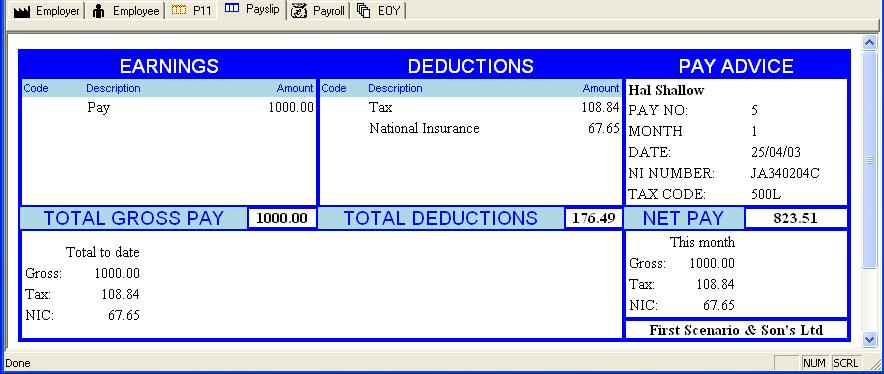
Select the employee and period of choice and press the Payslip button. In the payslip screen that appears, use the printer icon or File then Print to print the slip. Once you have printed the paylip, close the payslip window by choosing File then Close or clicking on close box in top right of the payslip window.
To print payslips for all employees, use the 'All payslips' button. Individual employees can be excluded by ticking using the 'no payslip' box under employee details.
|
A pre-printed payslip, printed through PDF can be chosen from the File, Print, On pre-printed stationery, provided the Payslip tab is selected. This will launch Adobe Acrobat and you can print the payslip(s) through there.
8.6.1 Printing Payslips
Bring up the payslip on screen and choose File, Print, On pre-printed stationery, provided the Payslip tab is selected. This will launch Adobe Acrobat and you can print the payslip(s) through there.
|
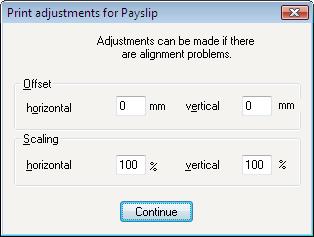
A print adjustments box will appear as shown. These can be changed depending on your particular printer. The default settings should be acceptable for most printers. See 'adjusting the printer parameters' below for a more detailed explanation on these adjustments. Adobe Acrobat should launch provided it is installed (if not go to www.adobe.com and download for free or see our cd). The P60/P14 can then be printed from there.
Initially leave offsets at 0,0 and 100,100
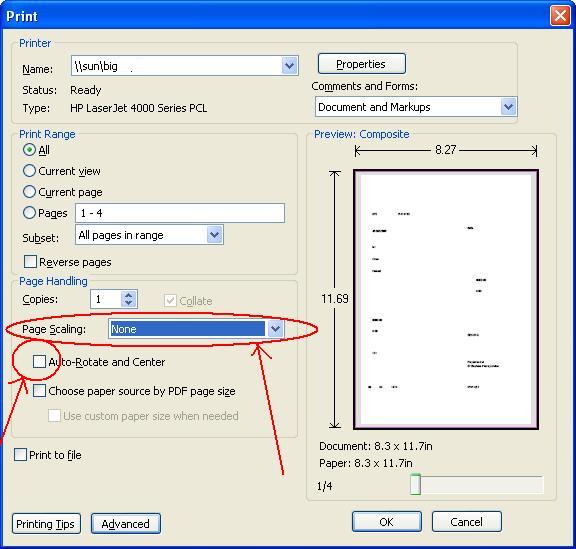
When it comes up in Adobe and you choose print, make sure that Adobe is not moving things around - deselect scaling and centring
|
The layout on screen is in a standard format, the pre-printed layout will vary depending on settings.
8.6.2 Selecting the layout
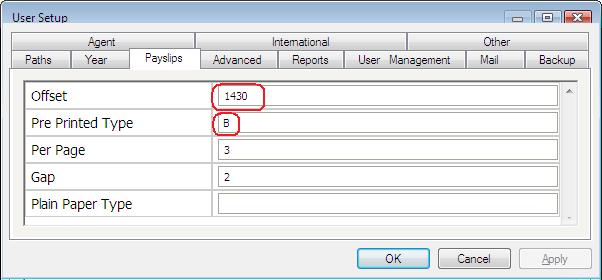
Under Tools / User Setup / Payslips
|
When you have two payslips per page the offset box is the distance from the top of the page to the second payslip in tenths of a millimetre. In the example shown, 1430 indicates the second payslip starts 143.0mm (14.3 cm) from the top of the page. Once the top payslip is aligned correctly you can adjust this to get the second one correct.
The pre printaed layout box allows you to select a predefined layout. "A" corresponds to a standard Sage compatible payslip, "B" to a standard Iris one. See the section below for modifying these to create your own.
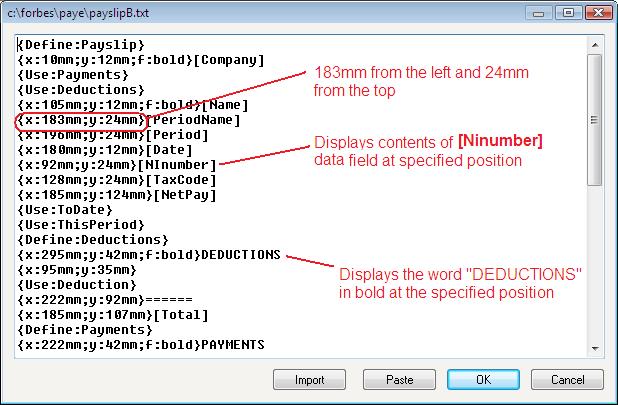
8.6.3 Editing the layout
Under Tools / Advanced / Edit Payslip layout
|
8.7.1 Starting a P14 or P60 Form
P14 and P60 printing requires a supply of the HMRC laser portrait P60s
8.7.2 PDF printing
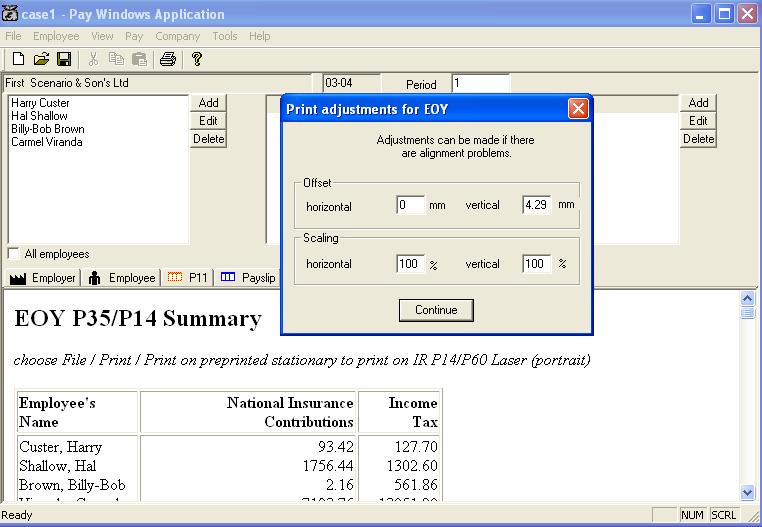
Once the payroll is complete for the year. Click on the EOY tab. A summary of the P14/P60 data is diplayed. The default settings are for portrait forms. To select Landscape, go to tools, user setup and tick 'use landscape P14s'. Once chosen the orientation, go to File,Print,On Preprinted Stationery.
|
A print adjustments box will appear as shown. These can be changed depending on your particular printer. The default settings should be acceptable for most printers. See 'adjusting the printer parameters' below for a more detailed explanation on these adjustments. Adobe Acrobat should launch provided it is installed (if not go to www.adobe.com and download for free or see our cd). The P60/P14 can then be printed from there.
Initially leave offsets at 0,0 and 100,100
When it comes up in Adobe and you choose print, make sure that Adobe is not moving things around - deselect scaling and centring

|
The offset parameters, horizontal and vertical affect the positioning of the top left of the output. They are specified in units of mm. If your output is coming out say 2mm too far to the right, subtract 2 from the value in offset horizontal. In the example above it would be reduced to -2. Similarily increasing horizontal offset will move the output further to the right. To adjust the boxes along the top of the form, reduce vertical offset to move the output up and increase it to move it down. Vertical offset is also specified in units of mm.
Once you have the boxes correctly aligned down the left and along the top of the form, you can adjust the remaining boxes using horizontal and vertical scaling. These are percentages. If your printer were perfect these would both be set at 100%. Looking at a box towards the bottom right, such as Tax Credits in this employment, reducing horizontal scaling by increments 1% will move the contents of this box approximately 3mm to the left. Increasing the scaling will move it to the right. Reducing vertical scaling in increments of 1% will move the contents up by approximately 2mm. Similarily increasing vertical scaling will move it down the page.
To produce a P45 go to the View, P45 menu and this produces a summary of the necessary P45 data. To print, this, go to File, Print, On pre-printed stationery and this will print out the P45 on the Inland Revenue supplied form
To file this electronically select the appropriate command from the eFile menu.
Under RTI there are no lonnger end of year returns. Simply mark the last FPS you send as a Final FPS
8.10.1 Introduction
The Employment Allowance is available from 6 April 2014. If you are eligible you can reduce your employer Class 1 NICs by up to £2,000 each tax year.
https://www.gov.uk/employment-allowance-up-to-2000-off-your-class-1-nics
8.10.2 How to claim your Employment Allowance
You will need to send an EPS using Efile / RTI / EPS ticking Emp Allce Ind.
Once made, HMRC will automatically carry your claim forward each tax year. So at the beginning of each year you should check your circumstances have not changed.
Simply reduce the amounts you pay to the HMRC, payment by an amount of Employment Allowance equal to your employer Class 1 NICs due, but not more than £2,000 per year.
Under company details there is an employment allowance indicator. You will be reminded to send an EPS until it is set as either Claimed or Ineligible.
8.10.3 Keeping track
Choose Company/HMRC Payments made to see the payments that you have made and the employment allowance utilised.
8.11.1 Introduction
Under RTI each time you pay employees a submission must be made to the HMRC. Under tools / user setup / advanced - tick RTI.
Each time you run a payroll report you will be asked if you want to transmit the information to the HMRC (this is referred to as an FPS transmission in RTI terminology). If you answer yes it will be automatically transmitted without further steps required.
8.11.2 Starters
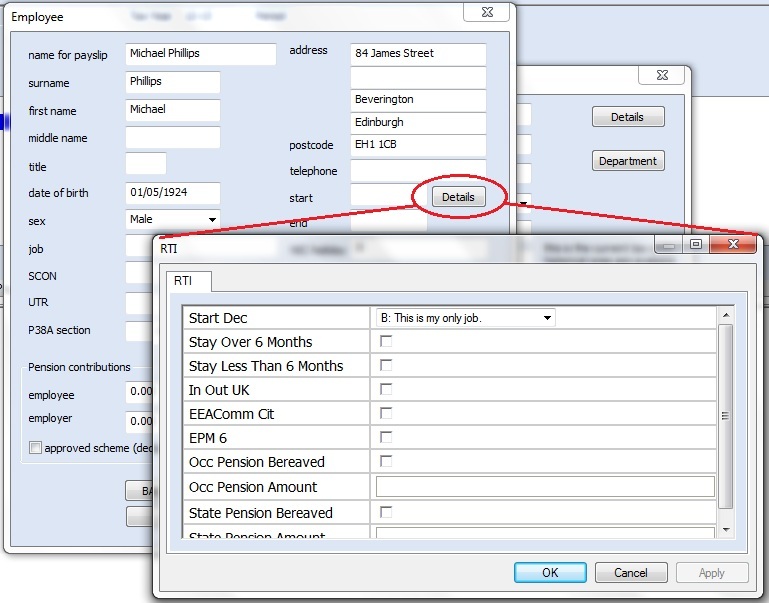
Further information is now required for new starters under RTI. Use the details button next to the start date box.
|
8.11.3 Common Questions
8.11.4 RTI and BACS
If you are paying by BACS under RTI a piece of information is inserted into field 7 of the BACS transmission to correlate the payment with the submission to the HMRC. This happens automatically. See the section below about BACs.
8.11.5 Extra fields added
| Company | UTR | Under company details | |
| Employee | Starter details | See above | |
| Employee | Passport Number | Under employee details button. | Not needed if already employee before RTI |
| Employee | Expected weekly hours | Under employee details button. | Will be transmitted as a) Up to 15.99 hrs b) 16-29.99 hrs c) 30 hrs or more, or d) Other. |
| Employee | ExPat | Under employee details button. | Tick if applicable |
| Employee | Occupation pension | Under employee details button. | Tick if applicable |
| Employee | Payment To A NonIndividual | Under employee details button. | Tick if not an individual person |
| Employee | Irregular employment | Under employee details button. | Tick if applicable |
| Employee | Scottish Variable rate | Under employee details button. | Complete if applicable |
| Employee | Foreign Country | Under employee details button. | Complete foreign country line of address if resident abroad. |
| Employee | Partners Details | In ASPP screen. | When claiming paternity pay. |
A full list of the fields is available at www.forbes.co.uk/manual/data-item-guide.htm or under help / rti data item guide
8.11.6 PayID and Works Number
Under RTI each employee has a PayId. We use the works number field. If you have not used this field you can set sequential numbers starting from 1 by using Tools / advanced / auto create works numbers. You should not change the works number of an employee once you have made RTI submissions.
8.11.7 First FPS
It is important that you complete the first pay period (M1 or W1) for each employee before sending the first FPS. You must do this even if there is no pay - enter 0 for the gross amount. All employees will be sent unless thay have a leaving date before the start of the tax year.
8.11.8 Other RTI submissions
8.11.9 Batch filing introduction
There are two types of batch filing.
For example for a sole director/employee whose monthly pay is set in advance you could send 12 FPS transmissions in April. This is covered in the section batch advance FPS filing below.
This is covered in the section multiple company filing below.
Please note for batch filing month 1 will be marked as the first FPS and month 12 as the final FPS
8.11.10 Batch advance FPS filing
To send multiple FPS transmissions in advance for a particular payroll, open the payroll, set up the data for all the periods (possibly using pay/advanced/pay 12)
Choose eFile/RTI/FPS batch
This option allows you to file up to 12 monthly FPS transmissions.
The transmissions will be queued up for sending and then transmitted. See batch transmission below.
8.11.11 Batch multiple company filing
In ClientBase select the clients that you are going to batch file. We would recommend setting up a group, and then using Select/By Group.
Once you have the clients selected in ClientBase choose Tools/Payroll/RTI Batch file and you will be prompted for which pay period you want to file FPS for.
This command assumes that you have entered the appropriate payroll information into the payroll program before using the command.
The transmissions will be queued up for sending and then transmitted. See batch transmission below.
8.11.12 Batch transmission
Batch filing happens automatically. For more information see section on Batch transmission in chapter 14.
8.11.13 RTI filing reports
In ClientBase choose Tools/Payroll/RTI filing report
In Payroll choose Reports/RTI filing report
This will produce a report accross all clients of successfull FPS transmissions from the information in the log, analysed by tax month.
8.11.14 RTI End of year
All though P35 filing has gone, the final FPS transmission of the year includes certain declarations about P11Ds.
When you file an FPS for month 12 you will be prompted for this information. Alternatively choose efile / final FPS
8.11.15 Earlier Year Update (EYU)
If you failed to submit an FPS on or before 19th April of the following tax year or you realise after this date errors have been made, you need to send an EYU.
If you are correcting an error in a previous tax year when you used FPS and EPS, your EYU should only record the difference between what you had originally submitted and what the figure should be.
For example, if you recorded £100 too little pay on an employee's payroll record, the EYU should show '+£100'. You can only amend year to date data on an EYU. If you need to submit more than one EYU, each submission must only show the amount of the amendment from the last figures submitted.
For example, if you submit a year to date figure of £10,000 for pay on your last FPS for the year, then realise that the figure should have been £12,000, you will submit an EYU to show '+£2,000'. If you then realise that the actual figure should have been £11,500, you must then submit a second EYU which will show '-£500'.
8.12.1 Intoduction
The software provides the following facilities
8.12.2 Staging date (duty start)
The staging date is determined by the size of an employer's PAYE scheme based on the number of persons within that scheme. The number of persons in a scheme is wholly derived from the latest information from HM Revenue and Customs held by the regulator on 1 April 2012.
You can find your staging date by going to http://www.thepensionsregulator.gov.uk/employers/tools/staging-date.aspx
Enter the staging date under company/details/automatic enrolment
If you have not completed the staging date (duty start) date you will be taken to the pension regulator website
8.12.3 Workers
The employer is responsible for ensuring that they have identified all those working for them who meet the definition of worker as workers
The software will calculate whether workers are eligible based on their age and pay.
If someone on the payroll is outside the scope of automatic enrolment and is to be excluded from these calculations, go to employee details then auto enrolment and tick exclude.
8.12.4 Bulk setting fields
You may wish to set a field for multiple employees in bulk. For example:-
You can now set such fields in bulk. You can use employee / auto enrolment / set fields for multiple employees.
You will be asked what field and what value to set it to and then get to select a subset of employees.
12.4.5 Reports
The system to produce reports listing certain categories of workers. These reports from the payroll system will be needed as inputs/prompts for the employer to take further action in order to comply with remaining aspects of the duties (eg around the administration of automatic enrolment, re-enrolment, opt out, opt in and the provision of information).
The reports are found in reports/automatic enrolment and should be run frequently.
The 9th report is called diagnostics. It shows some of the calculated fields for auto-enrolment.
12.4.6 Registration information
Shortly after they become subject to the duties for the first time, the employer is obliged to submit information to the regulator giving details of how they have discharged their duties. This is called registration
The deadline for registration is five months from the employer's staging date or where the staging period has ended, from the day that PAYE income first becomes payable in respect of any worker
Choose company / automatic enrolment / registration The data generated by the system in the core functionality may be used to support an employer in complying with the registration requirements.
12.4.7 Re-registration information
Broadly every three years after the duties start to apply the employer is obliged to submit information to the regulator giving details of how they have discharged their cyclical automatic re-enrolment duties. This is called re-registration.
Choose company / details / registration The data generated by the system in the core functionality may be used to support an employer in complying with the registration requirements.
12.4.8 Information packages
The employer is obliged to provide specified groups of workers with information about how they are affected by the duties.
The software contains templates for these letters. Choose employee / automatic entrolment / letter
12.4.9 Record keeping
Each employee has a subfolder of the client folder. This will have copies of letters sent to the employee. You can access the employee folder by selecting open employee folder from the employee menu.
12.4.10 Calculating pension contributions
Under employee details you can fill in the employer and employee percentages for contributions. You can then go to the pension contributions tab under the pay period and calculate the pension contributions. Traditionally pensionable pay has just been gross pay but you can manually edit this here. You can also set the software to exclude income above and below threshholds specified by the DWP. You can tick the box under employee details / pensions to enable this for employees. Please note it is simply calculating on a pro-rata basis and not a cumulative one. So for example if the the cap is £41,450 then the monthly cap will be £3,415.17
Forbes Payroll supports Bacs standard 18 as text or as a csv file. Under Tools / user setup / Reports select "standard 18 text"
The refernce filed will be the first 6 characters from each of the company name, the department and the works number.
Whenever you run a payoll report you will be asked if you want to generate a BACS file.
It is now possible to receive notices of coding (P9) etc electronically via the HMRC Data Provisioning Service (DPS). This is also a useful check of national insurance numbers and employee names are correct.
You can elect to change the way you receive P6, P9 notices etc. by logging on to the Government Gateway and selecting 'change notice options' from your PAYE online 'at a glance' page.
Choose Tools / DPS to download the data.
12.15.1 Attachment of earnings
You will need to be familiar with the manual operation of attachment of earnings deductions. See
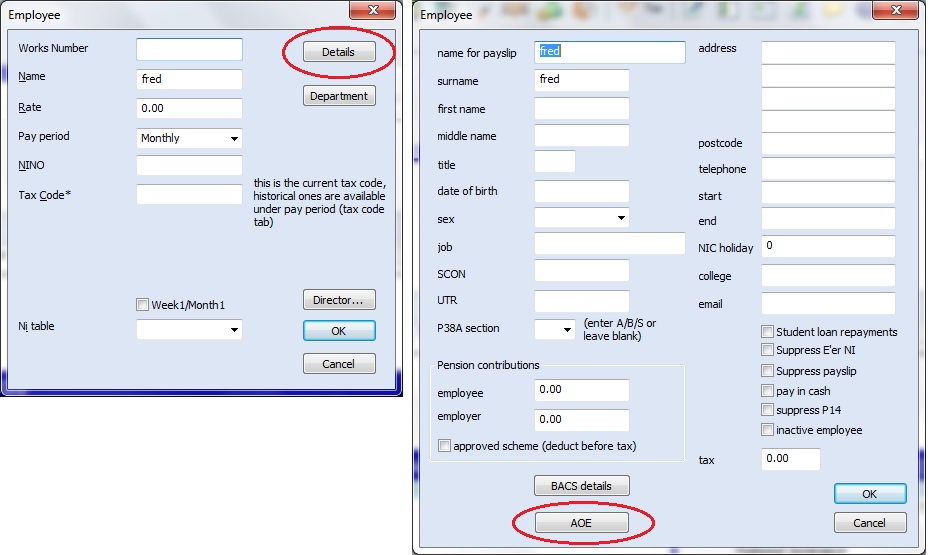
http://www.justice.gov.uk/downloads/guidance/courts-and-tribunals/courts/centralised-attachment-earnings-payment/ae_e0507.pdfSelect the employee and go into details then press the "AOE" button.
|
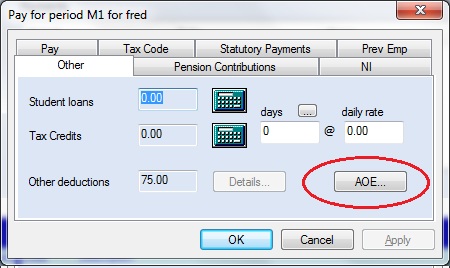
Enter the details of the order including the normal deduction rate (NDR) and the protected earnings rate (PER). The attachment will apply to any pay periods added after this information has been added under employee details. You may check this by going into the pay period and then the "other" tab and press the "AOE" button.
|
The deduction will appear on the payslip. If the order comes to an end, remove the information from employee details.